Warning: The Windows Registry Editor is a tremendously powerful yet dangerous tool. Even if very carefully used, a simple typo error in the wrong place can cause your Windows computer to crash on boot-up, thereby rendering it useless. While the InfoTouch-related registry entries should not hamper Windows' operation, an invalid registry entry for InfoTouch can certainly render InfoTouch 2000 useless on that computer.
InfoTouch 2000 uses special Windows registry values to provide register-specific controls and functions that aren't available in the general InfoTouch configuration area. The list of the available functions are available within the built-in extensive InfoTouch help system. At the main InfoTouch menu, click HELP - InfoTouch 2000 Help, and type REGISTRY into the search window. For example, below is a list of possibilities in version 8.31, the most current version at the time this help page was written.
Special Registry Values - InfoTouch 2000 Version 8.31
-
AdjustCashCheck - if set to "Y", all tenders except for Cash and Check will be filled in when entering tenders in the Reconcile Deposit screen during a Daily Closeout.
-
AutoStayInDept - if set to a department number (first department is "0"), the Register will always open that department's index button windows at the start of each transaction.
-
CmdLine - the full path of a third party application to run when a Run Outside Application button is touched.
-
DUP_SLIP_TAPE - if set, a duplicate receipt will be printed on all transactions, regardless of tender type or setup options. If set to "P", the system will pause and prompt to continue after printing the first receipt.
-
ForceCreditCardReceipt - if set to "Y", will force the printing of receipts for credit card transactions even if the Print button in the Register module is set to "No Print".
-
ITEM_KEYBOARD - if set to "Numeric", then the Register will use the numeric keypad rather than the full alphanumeric keyboard when ringing up items. This option is only relevant if you use manual item numbers.
-
MODEM_INIT - use to override the modem initialization sequence sent out at the start of a credit card verification. Only used if the Service Provider in Setup - General - Optional Tenders is set to "CES".
-
OPOS_LINE_DISPLAY - use to override the name of the OPOS line display (customer display) device. If set to something besides a blank value, OPOS line display support is enabled. If set to a blank value, OPOS line display support is disabled.
-
OPOS_MSR - use to override the name of the OPOS magnetic stripe reader (MSR) device. If set to something besides a blank value, OPOS MSR support is enabled. If set to a blank value, OPOS MSR support is disabled.
-
OPOS_SCALE - use to override the name of the OPOS scale device. If set to something besides a blank value, OPOS scale support is enabled. If set to a blank value, OPOS scale support is disabled.
-
OPOS_SCAN - use to override the name of the OPOS bar code scanner device. If set to something besides a blank value, OPOS bar code scanning is enabled. If set to a blank value, OPOS bar code scanning is disabled.
-
PRINT_BUTTON - if set to "N", then receipt printing is disabled at the station. If set to "O", the Print button in the Register module will initially display with the "Open Drawer" setting but may be changed.
-
PRINT_RECEIPT- if set to "N", then sales are not concluded when enough tender is accepted. You must touch a Print Receipt or Finish Transaction button to complete the sale.
-
RECEIPT - use to override the type of receipt printer for the station. Options include:
-
"S" - Star
-
"E" - Epson
-
"5" - Ithaca 50
-
"6" - Ithaca 60
-
-
RegReptCogs - if set, the cost of goods sold will appear on both the Register Shift and Register Daily reports.
-
RegReptSKU - if set to an item number, the sales of that item will appear on both the Register Shift and Register Daily reports.
-
SALE_HYPERLINK - set to a URL that will be displayed in your computer's default browser after each transaction.
-
SALE_SCREEN - use to control the department button window that initially appears. The first window is actually designated by setting the variable to "0", the second to "1", etc. If you put a minus sign (-) before the window number, the employee will not be able to change department button windows.
-
ShowLineItemNumber - if set to "Y", the Register will display the item number and as much of the description as will fit, instead of the full description. This setting has no effect on the format of receipts.
-
STATEMENT_HEADER - use to move the header lines for Customer Statements and Layaway Statements on the second and subsequent pages down. Set to the number of inches to move the header lines down.
-
STT_FRMT - use to override the receipt format type for the register. The variable should be set to the name of the receipt format file to use.
-
UseShortDescription - when printing Price Labels or Received Price Labels, the software will normally print the item's full description. When printing on very small labels, for example, those used by jewelry stores, there may not be room for the full description. If UseShortDescription is set, the "Use short description" check box will be default to checked rather than not checked.
How to make a registry entry
Click START - RUN - and in the box, type REGEDIT. Then click OK. The registry editor should appear.
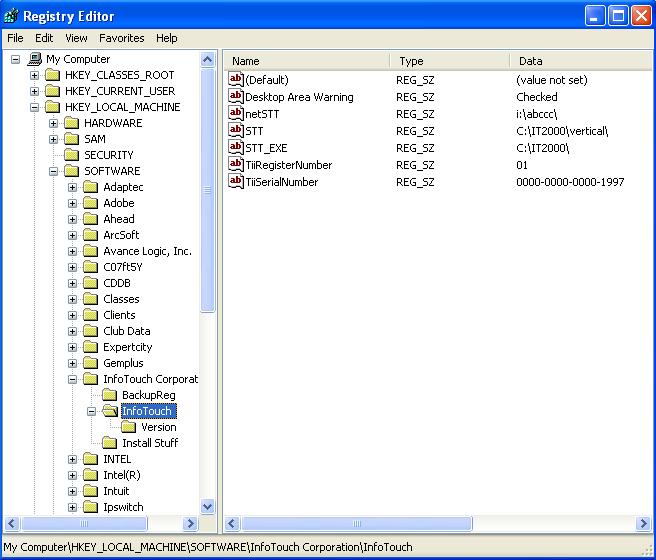
All InfoTouch registry values are inside the InfoTouch Corporation area. Here's a map of where to find it:
All InfoTouch registry edits are "string values" and adding a new string value is easy:
Once the string value is created, you need to rename it so that it matches the proper InfoTouch name. Right-click on the new value to get the rename option, then type the proper name for InfoTouch.
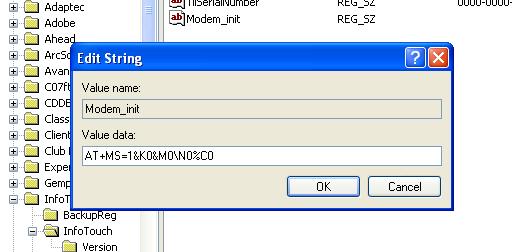
In this example, we've renamed the value to Modem_init which allows special control of the modem in the computer. We might use this to set up the modem for processing credit cards. Simple double-click on the new value to open up the edit mode, and then type the information. Finish by clicking OK.
When done, the registry value looks like this:
Close the registry editor by clicking on the X box in the upper right corner of the registry editor screen.
Restart your computer to ensure that Windows recognizes the new entry.